In the previous two posts (Connecting to Red Bear Labs Shield with Core Bluetooth & Getting going with iOS and Arduino using Bluetooth LE) I sent data to the Bluetooth LE shield on an Arduino, turning lights on and off. In this post I will look at receiving information from the Arduino and Red Bear Labs Bluetooth LE shield.
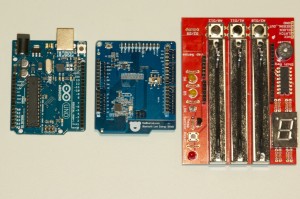
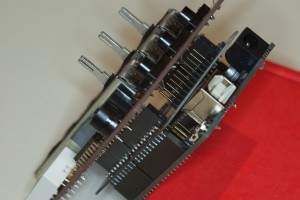
If you are new to Arduino you might not understand what the ‘shields’ are. Basically people with much better electronics knowledge than me have worked out how to hook up various components to arduino board using a standard set of headers. In this case the smart guys at Red Bear Labs have worked out how to wire a Nordic nRF8001 Bluetooth Low Energy IC to an Arduino. Each shield can have other shields stack on top of it. In this demo I am using a Danger shield from Sparkfun to provide 3 sliders to allow us to change the color of our iOS app.

The three shields to be used, the Arduino, the Red Bear Labs Bluetooth LE shield, and the Danger Shield.
We will use these shields will be to use the three sliders on the danger shield to control the iOS app. So you can get an idea of what is going to happening I have produced a short video of the end result.
The Arduino code is reasonably simple.
#include <SPI.h>

#include </code>
#define SLIDER1 A2 //Matches button 1
#define SLIDER2 A1
#define SLIDER3 A0 //Matches button 3
#define LED1 5
#define LED2 6
#define TEMP 4
#define LIGHT 3
int currentVal1;
int currentVal2;
int currentVal3;
void setup() {
SPI.setDataMode(SPI_MODE0);
SPI.setBitOrder(LSBFIRST);
SPI.setClockDivider(SPI_CLOCK_DIV16);
SPI.begin();
ble_begin();
Serial.begin(9600);
pinMode(SLIDER1, INPUT);
pinMode(SLIDER2, INPUT);
pinMode(SLIDER3, INPUT);
pinMode(LED1, OUTPUT);
pinMode(LED2, OUTPUT);
currentVal1 = 0;
currentVal2 = 0;
currentVal3 = 0;
}
void sendValueAsTwo7bitBytes(int value)
{
ble_write(value >> 8); // MSB
ble_write(value); // LSB
}
void loop() {
ble_do_events();
if (ble_connected()) {
digitalWrite(LED1, HIGH);
} else {
digitalWrite(LED1, LOW);
}
int val1 = analogRead(SLIDER1);
int val2 = analogRead(SLIDER2);
int val3 = analogRead(SLIDER3);
int val1Diff = currentVal1 - val1;
int val2Diff = currentVal2 - val2;
int val3Diff = currentVal3 - val3;
if (val1Diff > 10 || val1Diff < -10 || val2Diff > 10 || val2Diff < -10 || val3Diff > 10 || val3Diff < -10) {
currentVal1 = val1;
currentVal2 = val2;
currentVal3 = val3;
ble_write(1);
sendValueAsTwo7bitBytes(currentVal1);
ble_write(2);
sendValueAsTwo7bitBytes(currentVal2);
ble_write(3);
sendValueAsTwo7bitBytes(currentVal3);
char tempString[200];
sprintf(tempString, "Current Values: 1:%03d 2:%03d 3:%03d", currentVal1, currentVal2, currentVal3);
Serial.print(tempString);
Serial.println();
int val = analogRead(TEMP);
Serial.print("Temp: ");
Serial.println(val);
val = analogRead(LIGHT);
Serial.print("Light: ");
Serial.println(val);
}
}
The main change in this Arduino code is that the analog pins are setup for reading in the setup, and then in the main loop we check the values and if they differ from the stored values by more than 10 we will send that data to the Bluetooth host. I choose a value 10 to ignore tiny changes simply because of electrical interference or temperature changes.
When we send the data we are sending a sequence of 9 bytes, the first byte telling us which value we are about to read, then the value of the slider. Arduino’s have 10bit analog to digital converters, which means the values are between 0 and 1023. We also print these values to the serial output so that it is possible to watch what is happening on the shield while you are running.
On the iOS side of things it is a little more complicated. As the connection is made we need to drill down and find all of the information about device. A Bluetooth LE device is seen by Core Bluetooth is seen as a peripheral, each peripheral has many services and those services have characteristics. It is the characteristics that we are going to read from and write data to. The setup of these peripherals, services and characteristics is handled by the BLE.h library. This is done as a series of calls to the Core Bluetooth delegate.
Once the Bluetooth hardware is ready on our device, we call our startLookingForConnection method. The key call at this stage is the scanForPeripheralsWithServices providing our service ID.
[self.centralManager scanForPeripheralsWithServices:@[[CBUUID UUIDWithString:BLE_DEVICE_SERVICE_UUID]] options:nil];
All things going well, this will call our delegate method centralManager: didDiscoverPeripheral: advertisementData: RSSI:. We keep track of the peripheral , set our self as the delegate and then ask the central manager to connect to the peripheral. We are also updating a string property ‘bluetoothStatus’ so we can display a label with details of our status to the user.
- (void)centralManager:(CBCentralManager *)central didDiscoverPeripheral:(CBPeripheral *)peripheral advertisementData:(NSDictionary *)advertisementData RSSI:(NSNumber *)RSSI {
if (self.activePeripheral == nil || ! [self.activePeripheral isEqualToPeripheral:peripheral]) {
//Connect to peripheral.
self.activePeripheral = peripheral;
peripheral.delegate = self;
[self.centralManager connectPeripheral:peripheral options:[NSDictionary dictionaryWithObject:@YES forKey:CBConnectPeripheralOptionNotifyOnDisconnectionKey]];
self.bluetoothStatus = @"Discovered peripheral";
}
}
The next delegate method we handle is the connect/disconnect of the peripheral. I included a disconnect option so if the Arduino is power cycled the iOS app will reconnect. The main call to a connected peripheral is to make it discover the services available.
- (void)centralManager:(CBCentralManager *)central didConnectPeripheral:(CBPeripheral *)peripheral {

    self.activePeripheral = peripheral;

    [self.activePeripheral discoverServices:nil];

    self.bluetoothStatus = @"Connected peripheral";

}
- (void)centralManager:(CBCentralManager *)central didDisconnectPeripheral:(CBPeripheral *)peripheral error:(NSError *)error {
self.bluetoothStatus = @"Peripheral Disconnected";
if (self.activePeripheral == peripheral) {
self.activePeripheral = nil;
[self startLookingForConnection];
}
}
The discovery of services and the and subsequent discovery of characteristics are both delegate methods of the CBPeripheral. It is the individual characteristics of a service that we write data to, and read data from. In our case we send a message that we want to receive updates from every characteristic using the call [peripheral setNotifyValue:YES forCharacteristic:characteristic]; With this call we don’t have to poll for changes in our Bluetooth device. Our final check is to find the reset characteristic, which I think is a Red Bear Labs specific characteristic which we call when we are done reading data from the device.
- (void)peripheral:(CBPeripheral *)peripheral didDiscoverServices:(NSError *)error {

    if (!error) {

        for (CBService *service in peripheral.services) {

            [peripheral discoverCharacteristics:nil forService:service];

            self.bluetoothStatus = @"Discovered services";

        }

    } else

        NSLog(@"Service discovery was unsuccessful!\n");

}
- (void)peripheral:(CBPeripheral *)peripheral didDiscoverCharacteristicsForService:(CBService *)service error:(NSError *)error {
if (!error) {
CBUUID *deviceUUID = [CBUUID UUIDWithString:BLE_DEVICE_SERVICE_UUID];
for (CBCharacteristic *characteristic in service.characteristics) {
[peripheral setNotifyValue:YES forCharacteristic:characteristic];
if ([service.UUID isEqual:deviceUUID]) {
CBUUID *resetUUID = [CBUUID UUIDWithString:BLE_DEVICE_RESET_RX_UUID];
if ([characteristic.UUID isEqual:resetUUID]) {
self.resetCharacteristic = characteristic;
}
}
}
self.bluetoothStatus = @"Discovered characteristics";
} else
NSLog(@"Service discovery was unsuccessful!\n");
}
With the device setup we are now ready to receive data from the Bluetooth Shield. We receive delegate callbacks to the peripheral:didUpdateValueForCharacteristic:error: The values from the sliders are at byte ranges 1-2, 4-5 and 7-8. We need to unswap the order of the byte values, something you have to be aware of as the architecture of a Bluetooth LE device might be different from the iOS device. In this case we swap the bytes and return a UInt16 value with the bytes returned to a value that iOS can use. Once the bytes are unwrapped we store them in local variables.
-(UInt16) swap:(UInt16)s {

    UInt16 temp = s << 8;
    temp |= (s >> 8);

    return temp;

}
- (void)peripheral:(CBPeripheral *)peripheral didUpdateValueForCharacteristic:(CBCharacteristic *)characteristic error:(NSError *)error {
if (!error) {
NSData *recData = characteristic.value;
UInt16 buffer = 0;
[recData getBytes:&buffer range:NSMakeRange(1, 2)];
UInt16 val1 = [self swap:buffer];
self.value1 = val1;
[recData getBytes:&buffer range:NSMakeRange(4, 2)];
UInt16 val2 = [self swap:buffer];
self.value2 = val2;
[recData getBytes:&buffer range:NSMakeRange(7, 2)];
UInt16 val3 = [self swap:buffer];
self.value3 = val3;
self.bluetoothStatus = @"Updated values";
} else {
NSLog(@"Error reading data: %@", error);
}
unsigned char bytes[] = {0x01};
NSData *singleByte = [[NSData alloc] initWithBytes:bytes length:1];
[peripheral writeValue:singleByte forCharacteristic:self.resetCharacteristic type:CBCharacteristicWriteWithoutResponse];
}
For our user interface I have thrown in some Reactive Cocoa to make it simple to update the user interface when changes occur in our Bluetooth device. The ins and outs of Reactive Cocoa are for another blog post, but it is a perfect match to the asynchronous nature of Bluetooth devices. The label text is hooked up to the bluetoothStatus field that we are updating in our controller, and the background color is derived and updated whenever one of the values from the Bluetooth device is updated. Note that the values from the Arduino analog pins are a 10 bit integer, so they need to be divided by 1024 to get a float value suitable for calculating a color.
#import "LTViewController.h"

#import "LTRedBearLabsController.h"

#import <ReactiveCocoa/ReactiveCocoa.h>
@interface LTViewController ()
@property LTRedBearLabsController *bleController;
@end
@implementation LTViewController
- (void)viewDidLoad {
[super viewDidLoad];
[[LTRedBearLabsController sharedLTRedBearLabsController] startLookingForConnection];
self.bleController = [LTRedBearLabsController sharedLTRedBearLabsController];
RACBind(self.connectionLabel.text) = RACBind(self.bleController.bluetoothStatus);
[[RACSignal
combineLatest:@[ RACAble(self.bleController.value1), RACAble(self.bleController.value2), RACAble(self.bleController.value3)]
reduce:^(NSNumber *value1, NSNumber *value2, NSNumber *value3) {
return [UIColor colorWithRed:value1.floatValue / 1024.0f
green:value2.floatValue / 1024.0f
blue:value3.floatValue / 1024.0f
alpha:1.0f];
}]
subscribeNext:^(UIColor *backgroundColor) {
self.view.backgroundColor = backgroundColor;
}];
}
@end
While the process is a multiple step one it is quite easy to get the details of your bluetooth device and receive information as it is updated. It is now easy for your iOS app to control the real world, or for a ‘dumb’ device to now connect to an iOS device and display its status.

Leave a Reply