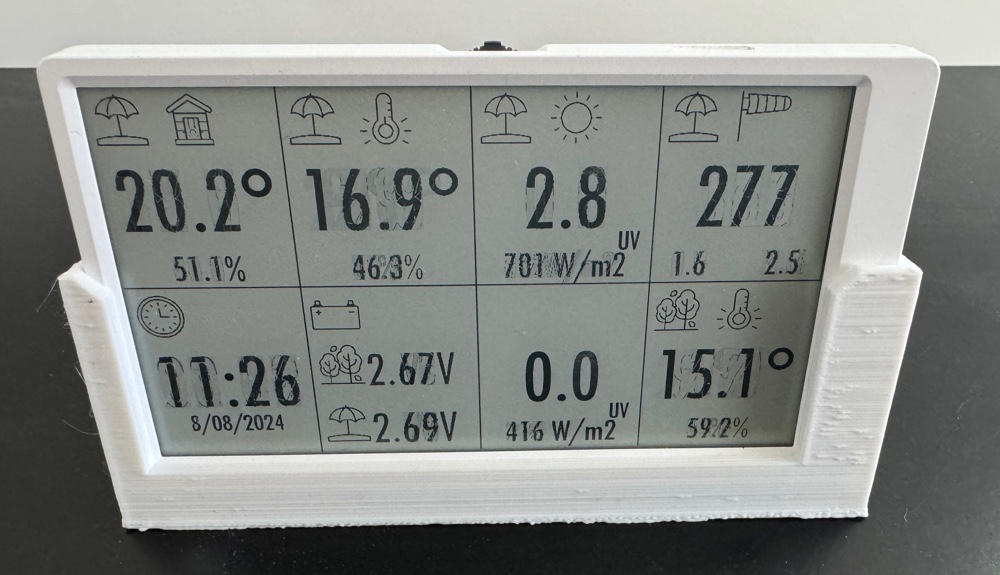
I used the M5Paper to create a weather station display. The ESP32 listens to local UDP messages from the weather stations (local temp, wind speed & direction), and connects to MQTT server to retrieve various other details. I use the internal temperature sensor for internal temperature and humidity. The display updates various sections when new data is retrieved.

Physical device:
The device is well presented. Using this 3D printed stand: https://www.printables.com/model/65311-m5paper-angle-desktop-stand printed in white PLA matches the rest of the devices surround nicely.
The internal battery lasts long enough to move the device around and unplug and replug power cables etc. I haven’t done a formal test but it seems to last 3~4 hours, obviously this will depend on what you have the processor doing and the number of screen refreshes.
Internal Temperature sensor: Seems to read a degree or two (C°) higher than other probes in the area. This might be influenced by internal electronics or the packaging.
If using the right redraw options the screen (or even parts of it) doesn’t ‘flash’ to refresh. The screen isn’t 100% sharp but for the purposes of a weather station display that needs to be readable from a distance this is fine.
Programming Notes:
I could program the device but could not get the display working with either MicroPython or CircuitPython.
For Arduino there are some good examples of providing drawing in the examples folder. Once the M5Stack Arduino support is installed (https://docs.m5stack.com/en/arduino/arduino_ide) then the M5Paper examples are in the M5EPD folder. The examples using TrueType Fonts use SPIFFs file system. I was unable to get this working, with most people suggesting that LittleFS is the newer alternative. Quite a few of the instructions and code are for the Arduino 1.X IDE. For Arduino 2.X IDE use the following instructions for installation: https://randomnerdtutorials.com/arduino-ide-2-install-esp32-littlefs/
Little FS Quick Notes:
- Arduino IDE is based on Visual Studio Code — Plugins are accessed via Cmd-Shift-P
- Anything in the data directory stored next to your *.ino file will be uploaded and accessible via code
- Make sure no serial windows are open before trying to upload, otherwise the files will fail to upload.
- Partition scheme that works with M5 Paper — 8M with SPIFFS (3MB APP/1.5MB SPIFFS)
In the Arduino IDE the File -> Examples -> M5EPD -> Basics -> M5EPD_TTF example includes loading a TTF from the ESP32s device storage. To change to LittleFS the following steps need to be made:
Replace: #include "SPIFFS.h"
With: #include <LittleFS.h>

Replace:
    if (!SPIFFS.begin(true)) {
        log_e("SPIFFS Mount Failed");
        while (1)
            ;
    }

With:
    if (!LittleFS.begin(false)) {
        log_e("LIttleFS Mount Failed");
        while (1)
          ;
    }

Replace:
    canvas1.loadFont("/GenSenRounded-R.ttf",
                     SPIFFS);
With
    canvas1.loadFont("/GenSenRounded-R.ttf",
                     LittleFS);
Everything will hopefully work for loading fonts.
The examples of drawing and updating the display provided in the examples directories are fairly comprehensive.
I using the following to perform an initial setup on the device:
M5.begin();
M5.SHT30.Begin();
M5.EPD.Clear(true);
The last line causes the screen to flash a couple of times and replace whatever was previously display (E-Paper doesn’t change when power is lost).
Each section of the screen can be drawn without re-drawing the entire screen. Initial setup for each of the eight canvases:
    canvas->createCanvas(240, 270);
    // canvas->loadFont(binaryttf, sizeof(binaryttf));
    canvas->loadFont("/Futura-CondensedMedium.ttf", LittleFS);
    canvas->setTextColor(15);
    canvas->setTextDatum(TC_DATUM);
Typical canvas drawing code is as follows:
    indoor_temp_canvas.clear();
    indoor_temp_canvas.drawPngFile(LittleFS, "/beach.png", 1, 1);
    indoor_temp_canvas.drawPngFile(LittleFS, "/indoorTemp.png", 90, 1);

    indoor_temp_canvas.createRender(fontXLarge, 238);
    indoor_temp_canvas.setTextSize(fontXLarge);
    indoor_temp_canvas.drawString(String(indoorTempChar) + "°", 119, 100);
    indoor_temp_canvas.createRender(fontMedium, 238);
    indoor_temp_canvas.setTextSize(fontMedium);
    indoor_temp_canvas.drawString(String(indoorHumidityChar) + "%", 119, 220);
    indoor_temp_canvas.drawFastVLine(238, 0, 270, 2, 0xFFFF);
    indoor_temp_canvas.drawFastHLine(0, 268, 240, 2, 0xFFFF);
    if (indoor_temp_canvas_setup) {
        indoor_temp_canvas.pushCanvas(0, 0, UPDATE_MODE_DU4);
    } else {
        indoor_temp_canvas_setup = true;
        indoor_temp_canvas.pushCanvas(0, 0, UPDATE_MODE_GC16);
    }
For loading images you can see the drawPngFile, the co-ordinates are the X,Y location based on the top-left being 0,0.
The first time you draw a section of the screen, UPDATE_MODE_GC16 is needed, Once this has been done once then UPDATE_MODE_DU4 can be used. While the screen doesn’t look perfect, especially up close (check any of the numbers). From a distance this isn’t noticeable. If you use UPDATE_MODE_GC16 this causes a black flash of the screen which can be quite distracting. Some sections of the screen will occasionally swap from one display (eg UV swaps to mm of rain if it has been raining) and UPDATE_MODE_GC16 is needed again.
I did find that if you use too many font sizes the device would crash and restart, noticeable because the device swaps from White -> Black -> White on the display. I settled for 4 font sizes and this seems to work without restarting.
The following code was used for setting the M5 Paper’s real time clock
void setupTime() {
    M5.RTC.begin();

    configTime(gmtOffset_sec, daylightOffset_sec,
               ntpServer);

    struct tm timeinfo;
    if (!getLocalTime(&timeinfo)) {  // Return 1 when the time is successfully obtained
        Serial.println(F("Failed to obtain time"));
        return;
    } else {
      Serial.println(F("Retireved Time Info"));
    }

    RTCtime.hour = timeinfo.tm_hour;
    RTCtime.min  = timeinfo.tm_min;
    RTCtime.sec  = timeinfo.tm_sec;
    M5.RTC.setTime(&RTCtime);

    RTCDate.year = timeinfo.tm_year + 100;
    RTCDate.mon  = timeinfo.tm_mon;
    RTCDate.day  = timeinfo.tm_mday;
    M5.RTC.setDate(&RTCDate);
}
Once set the display seems to keep reasonably accurate time. The display doesn’t update every second so it is expected to be a couple of seconds behind.
Leave a Reply